


Setup Your Own Private Video Chat Server with Jitsi Meet
A Complete Guide to Setting up a Jitsi Server
Online communication is becoming more sophisticated every day. What once began as a simple text-based electronic mail message has morphed into a whole range of different types of communication all using the world wide web. Sure, we still have text messaging, but now it’s augmented with emojis 😃 🙏 😇; we still have e-mail, but it’s now connected to all our social media accounts; and social media has opened the door to sharing photos, memes, soundbytes, videos, live streams, and more. Popular platforms such as Skype, Google Hangouts, and Facetime have made face-to-face communications over the web a reality. But, not all platforms are created equal, and many of the popular apps we like to use on a regular basis are full of security flaws. Sometimes these security flaws can be exploited by an attacker attempting to steal our personal data, damage our computers with a virus, or cause a disruption just for laughs. This kind of activity is all too common on the internet–why else would we have to constantly update our computers to get the latest “security patches?”
Popular video conferencing platforms are not immune to security vulnerabilites. Many users of these platforms have been the victims of hackers disrupting their transmissions. This kind of interruption is not only an attack on privacy, they are often accompanied with inappropriate images and other pranks, which may be offensive for those attending the meeting. How might someone combat this problem?

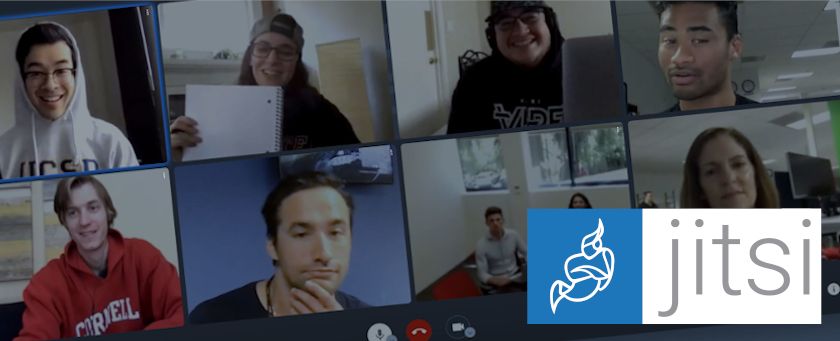
Jitsi is a free and open source collection of programs, particularly Jitsi Meet and Jitsi Videobridge, which enable users to create their own private video conferences. Because the software is open source, the source code may be viewed by anyone. With multiple eyes inspecting the code, we can be sure that invulnerabilities are spotted and patched, making Jitsi one of the most secure video conferencing solutions available to anyone. The best part is: Jitsi is totally free!
Jitsi provides its own servers that anyone can use for free, however, for added security, some organizations may prefer to run their own instances of Jitsi Meet. There are several benefits to running your own Jitsi server, including:
- Using dedicated hardware tailored to your needs
- SSL encryption via Certbot for secure connections
- Personalized URL (e.g. jitsi.fatherjim.tech)
- Password protected meeting rooms
- Ability to assign moderators for meetings
- Ability to lock the server, preventing random & anonymous users from entering a conference
Jitsi is one of the best solutions for any organization interested in having online video conferences, whether it be for churches, schools, businesses, or even families. One of the best ways to bolster security and privacy for your online meetings is by hosting them on your own secure server.
The following is a step-by-step guide for how to setup Jitsi Meet on a dedicated virtual private server (VPS). For those who would like to use their own equipment, simply skip the step for renting a VPS.
Table of Contents
Please use these links to quickly jump to each section. Use the browser’s back button to return to this menu.
- Add a New Server
- Create a Subdomain
- Update the VPS
- Add Domain to Hostname File
- Add Domain to Hosts File
- Install Prerequisite Packages
- Add Jitsi Repo to Package Manager
- Install Jitsi Package
- Secure the Server with Letsencrypt
- Setup Authentication for Moderators
Step 1 - Choose a Server Provider
There are several providers of virtual private servers (VPS’s) online. Below are some of the more popular choices.
Vultr
Vultr has an excellent collection of hardware and configuration options from cloud computing to bare metal. Beyond that, Vultr has servers in multiple locations around the world. If you decide to use Vultr, using my affiliate link will earn you $100 in credit towards your VPS rental. Click here for Vultr .
Digital Ocean
Digital Ocean is another popular platform with similar offerings as Vultr. It also has an excellent collection of hardware and configuration options, as well as servers in multiple locations around the world. If you decide to use Digital Ocean, using my affiliate link will earn you $100 in credit towards your VPS rental. Click here for Digital Ocean.
Contabo
Contabo is a lesser-known platform based in Germany that offers competitive rates, especially for VPS cloud computing, which is fine for hosting a Jitsi Server. Users may choose from servers in Germany or the United States. Click here for Contabo.
Step 2 - Determine VPS Specifications
Before renting a VPS, it is important to determine how many users will be accessing the server at one time. If your instance of Jitsi Meet is only for chatting with friends and family members, then a VPS with minimal specs should work fine. For more demanding workloads, two additional considerations will make or break the user experience:
- CPU cores & RAM
- Internet Bandwidth
Fortunately, Jitsi’s suite of programs can run on pretty average specifications. Jitsi’s own testing was performed using a 4-Core Xeon E5-1620 @ 3.7GHz with 3GB of RAM. Such a machine was capable of 1,000 streams at about 20% CPU usage and 550Mbps of internet bandwidth (it is important to note that the average participant will use between 75 and 100 streams). Each video stream was set to ~500 Kbps, which is quite low, however, a server with these specs should reasonably handle up to 25 video streams at a bitrate of ~500 Kbps. For more information about Jitsi’s in-house testing, click here .
For the purpose of this article, we will setup a VPS cloud server to handle around 20 active users at one time. To determine the amount of bandwidth needed, simply multiply the maximum number of users expected to be connected at one time by 3. So, for 20 users, the minimum bandwidth for the server should be 600 Mbps (or 60,000 Kbps). This will allow for each user to broadcast up to a 3,000 Kbps HD video stream.
To host video conferences with a higher number of participants, it is recommended to configure the server to audio-only mode and restrict the number of video feeds to less than 5. The Jitsi team is working on optimizations to allow a greater number of participants on a single server. It is possible to create a cluster of servers called a “shard” that work together to provide enough compute power to host a higher number of participants, but for the purposes of this article, we will stick to a single server.
Step 3 - VPS Setup
For the sake of simplicity, we will use Vultr to demonstrate the VPS setup process. These steps may vary from platform to platform, however, the fundamentals remain the same. After creating a new account on Vultr and adding a funding source, click on the products button and follow the steps below.
A. Add New Server
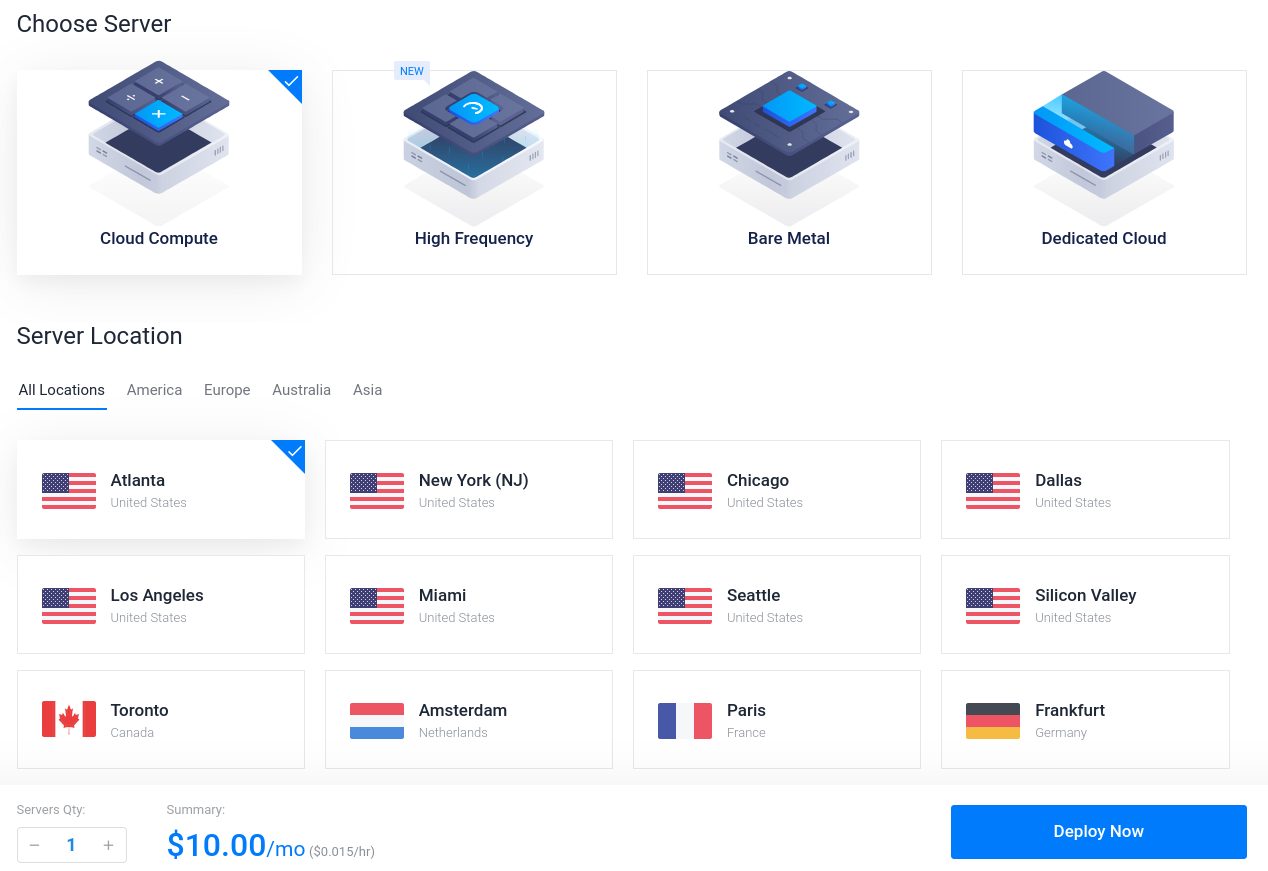
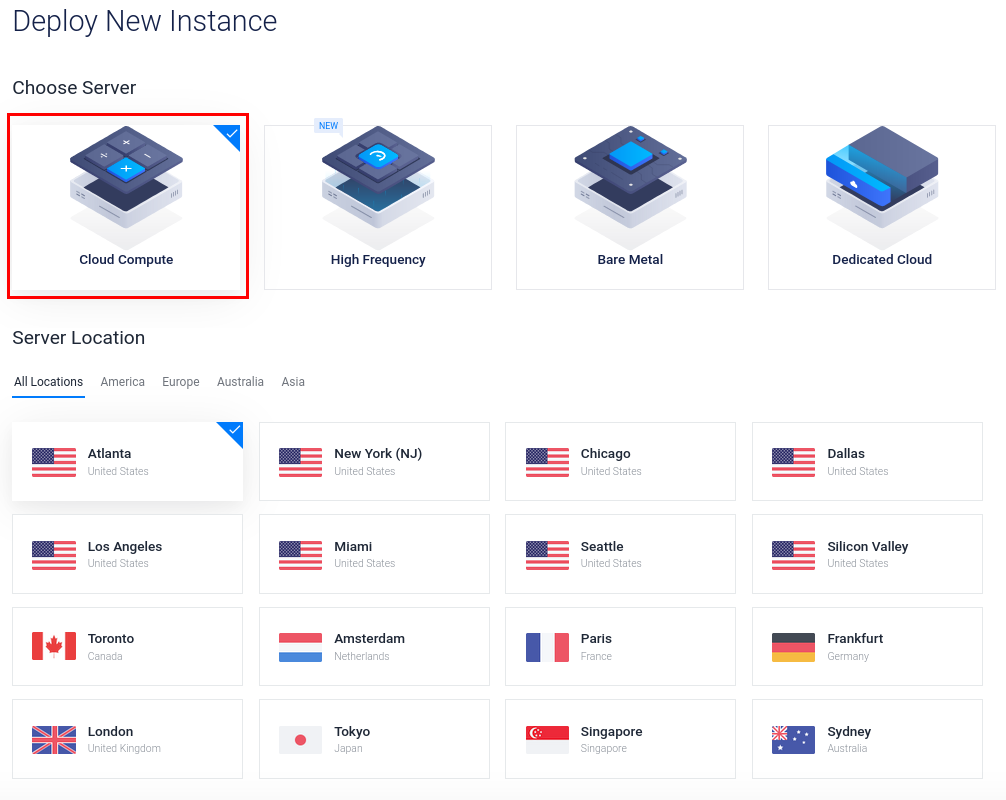
Click the + to add a new server.

Choose Cloud Compute and a location closest to where most of the people will be accessing the server.
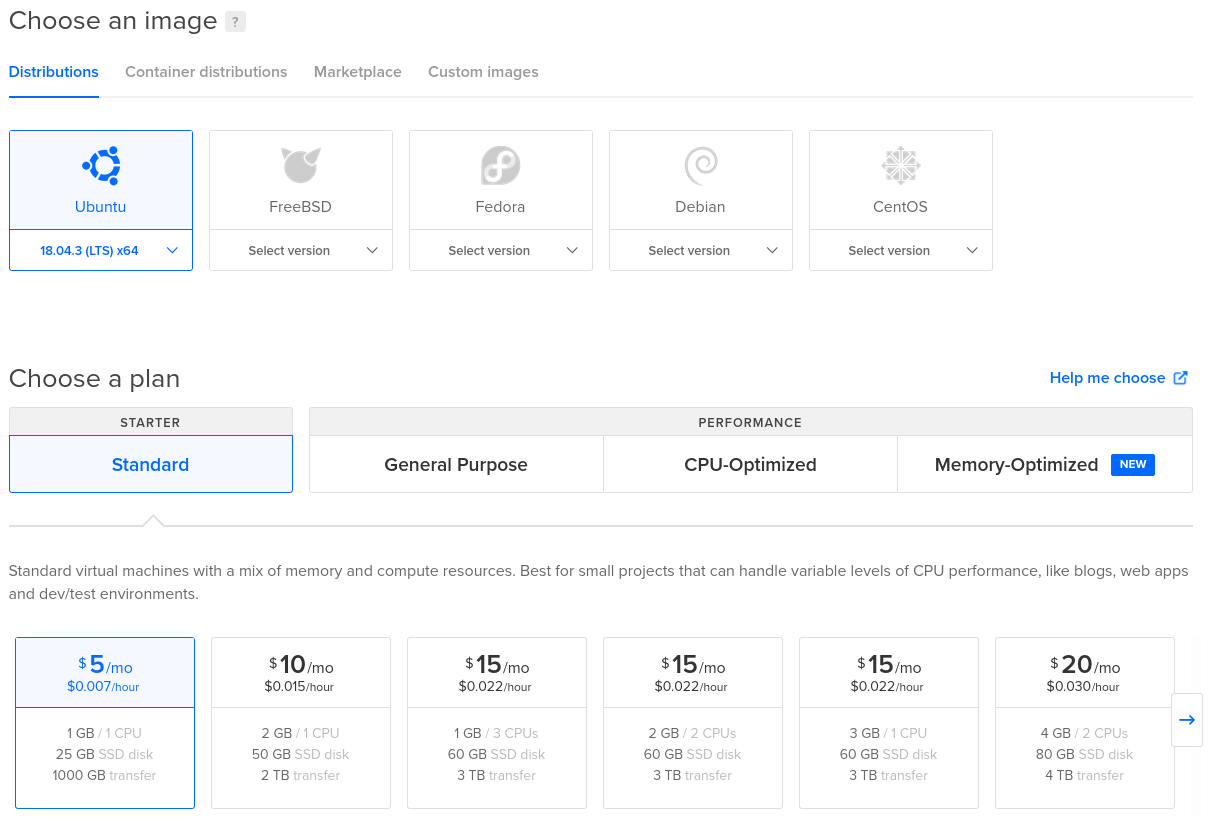
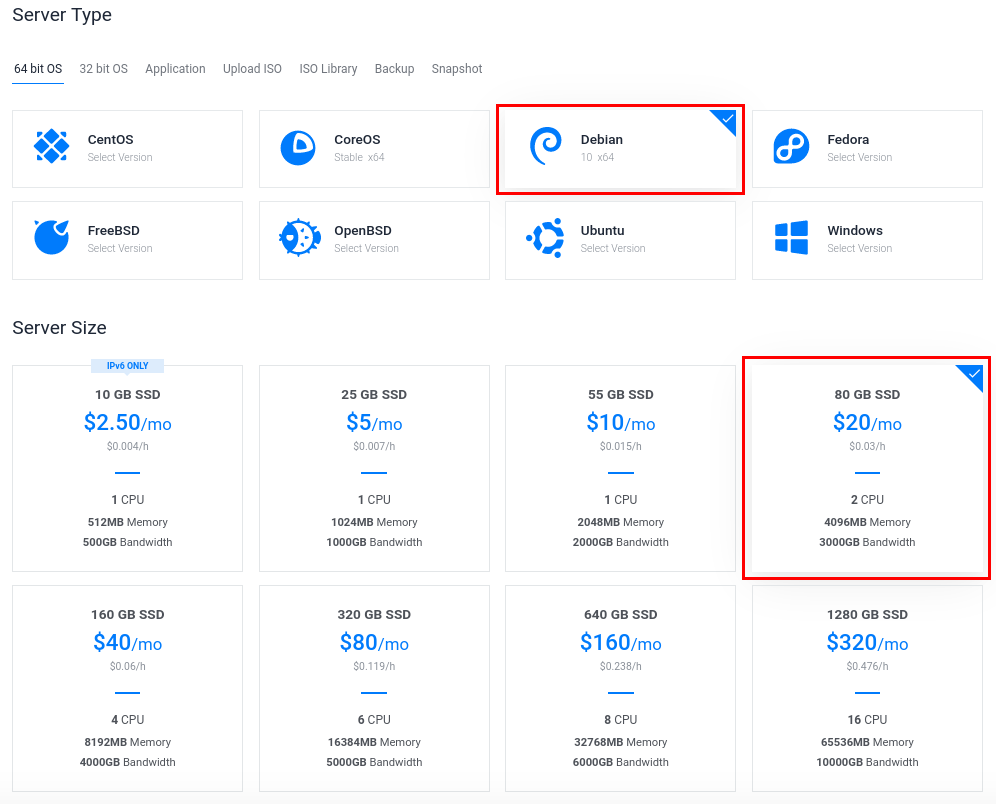
For stability, we will use Debian 10 x64 OS and the $20/month server with 2 CPU cores, 4GB of RAM, and 3000GB bandwidth. Please note, the $20/month server is about the bare minimum to handle 200 simultaneous HD video streams. The $40/month server with 4 CPU cores will provide more adequate performance.
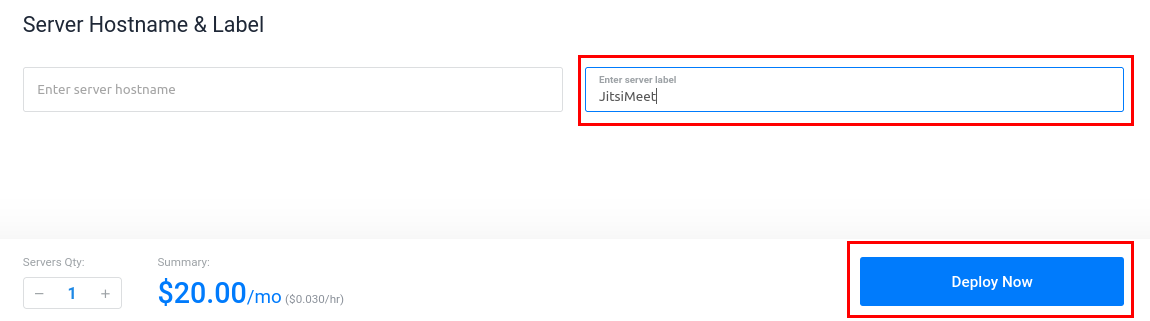
Lastly, give the server a label and click Deploy Now to deploy the newly configured Debian 10 server.
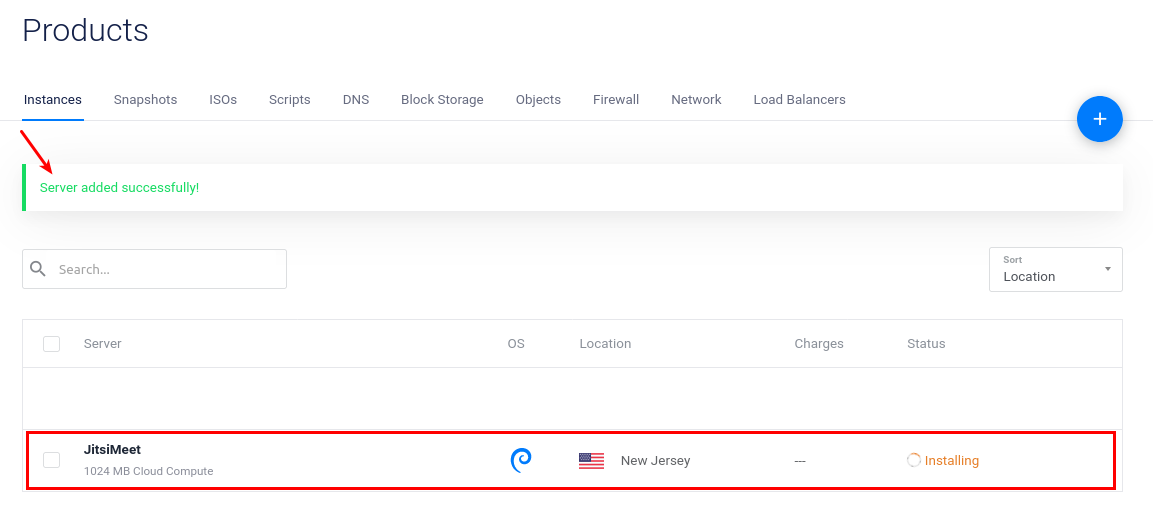
The operating system will now be installed on the server. Once the installation is complete, click on the server to reveal the login information.
Note: Other VPS providers may opt to send an e-mail with the VPS login information.
B. Create a Subdomain (“A” Record) on your Domain
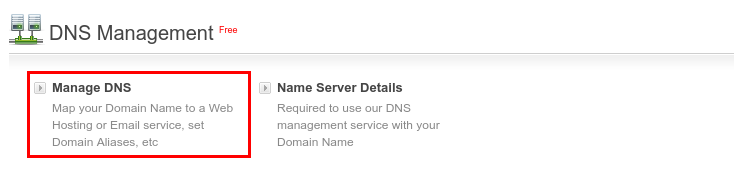
To take advantage of the free SSL encryption provided by Certbot, you will need to add an “A” Record to your fully qualified domain name (FQDN). To do this, login to your domain name provider and navigate to the DNS Manager. For this example, we will use whois.com .
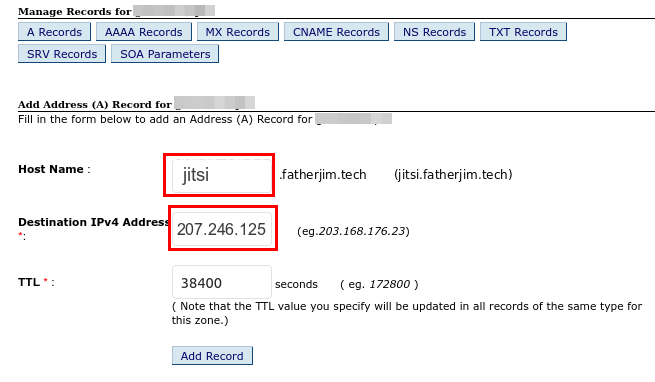
Next, add an A (Host) Record.
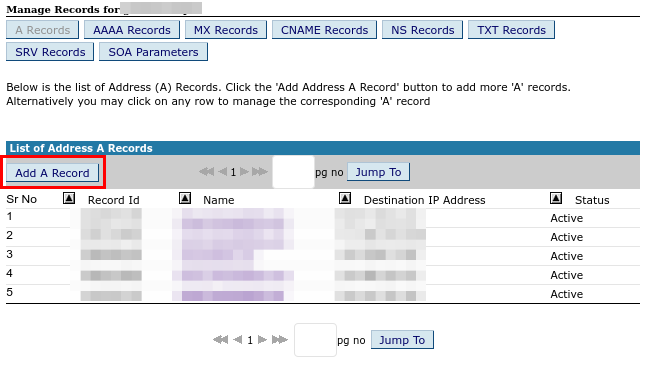
Give it a name, e.g. jitsi, and paste the IP address of the VPS server (from the Server Information page on Vultr or the e-mail sent by your VPS provider) as the Destination IPv4 Address. The default TTL will be fine.
Note: It can take the DNS up to several hours to propogate the changes, so please be patient with this process.
To test that the A record has been successfully connected to the server, issue the following command in a terminal or command prompt ping jitsi.yourdomain.com (replacing yourdomain.com with your own domain). If the ping returns the correct IP address, then the subdomain has been propogated.
Alternatively, you could use a website such as ipinfo.info to verify via your browser. Simply enter your domain (e.g. jitsi.example.com) and click check.
Step 4 - Install & Configure Jitsi
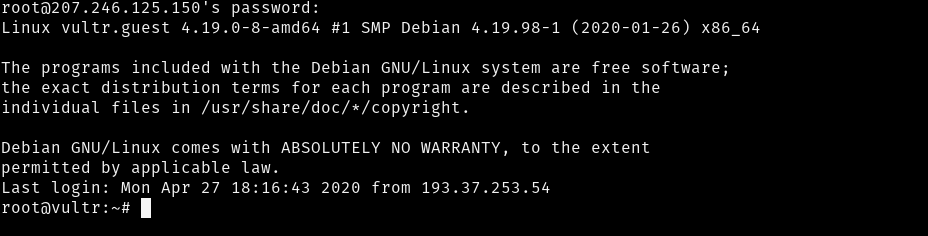
A. Logging Into the VPS
Logging into the VPS requires the use of a terminal program. For more advanced Mac and Linux users, simply open Terminal and use ssh to login with the username and password provided. For Windows users, a terminal program such as Putty is recommended.
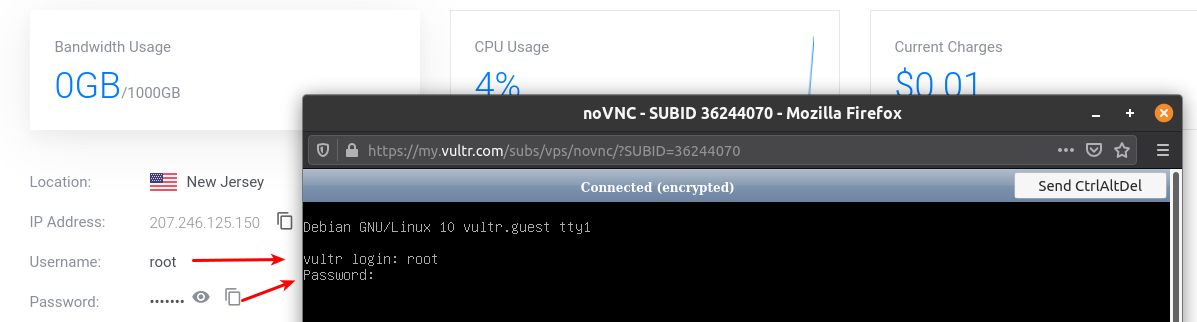
For users unfamiliar with the terminal, Vultr provides a built-in terminal that can be accessed via the Server Information page.
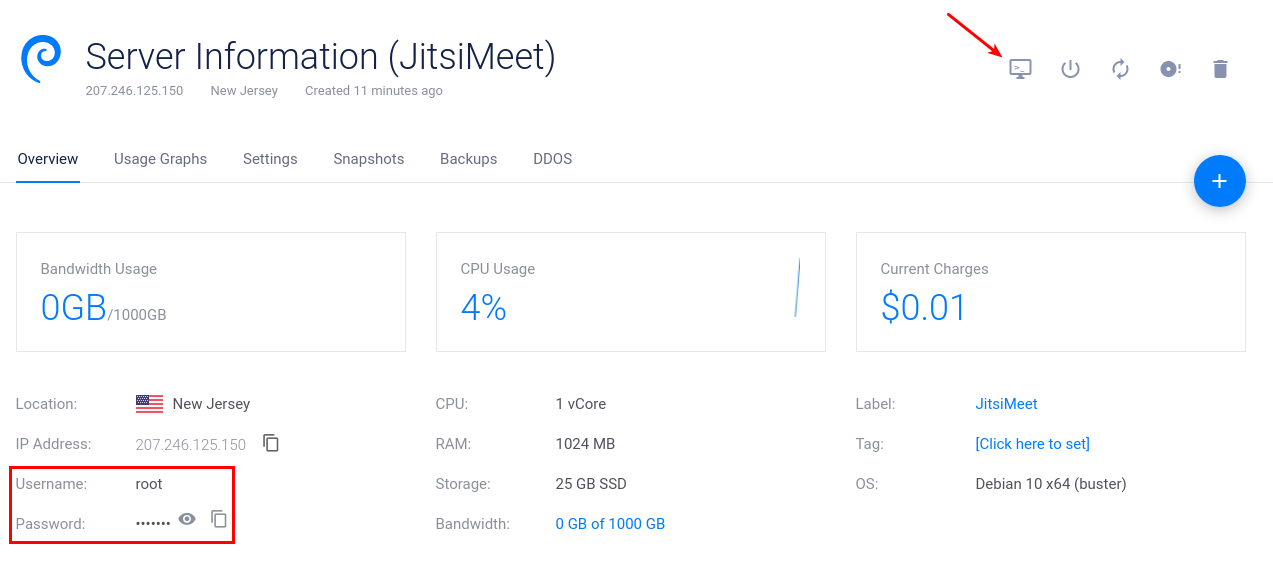
Click on the terminal icon, then use the username and password provided to login to the server.
Once logged in, we can begin to issue commands to install Jitsi.
B. Update VPS & Add Domain
Carefully type each command one-by-one followed by [Enter]. When prompted, answer ‘Y’ for ‘yes’ to proceed with installation of packages.
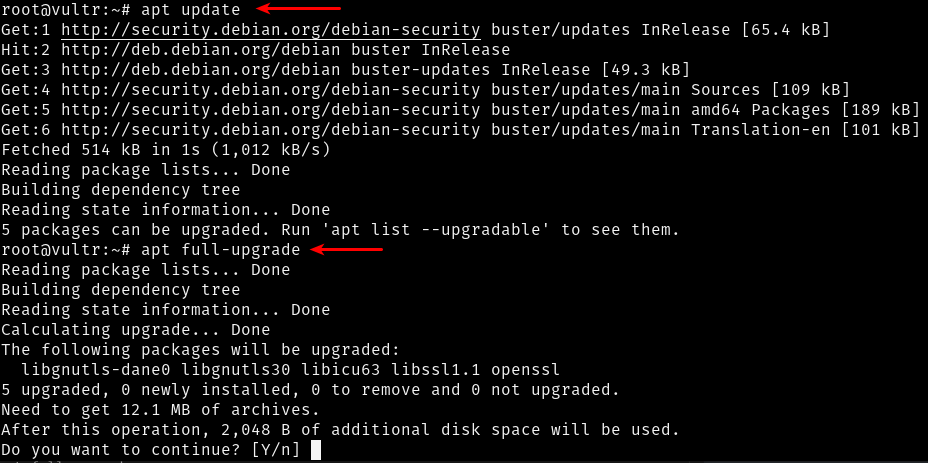
1: Make sure the server is entirely up-to-date:
apt update
apt full-upgrade
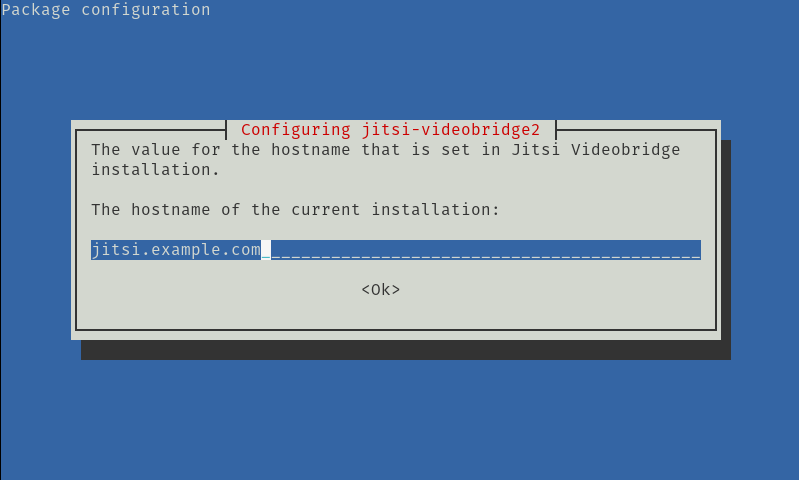
2: Add your subdomain to /etc/hostname:
nano /etc/hostname
Replace the existing hostname with your domain (e.g. jitsi.example.com).
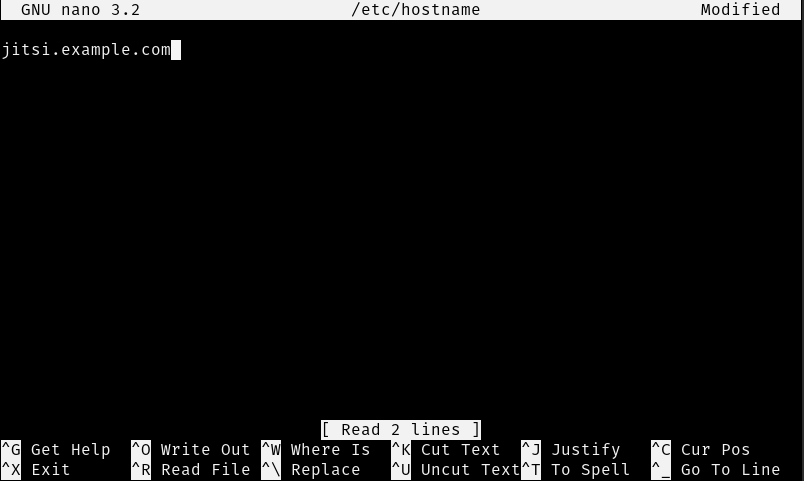
Use [Ctrl-X] to quit and [Y] for yes to save the file.
3: Add your FQDN in /etc/hosts:
nano /etc/hosts
To determine the loopback IP, simply increment the third number in the IP address by 1 (e.g. 127.0.1.1 -> 127.0.2.1). Then add the FQDN (Fully Qualified Domain Name) followed by the subdomain.
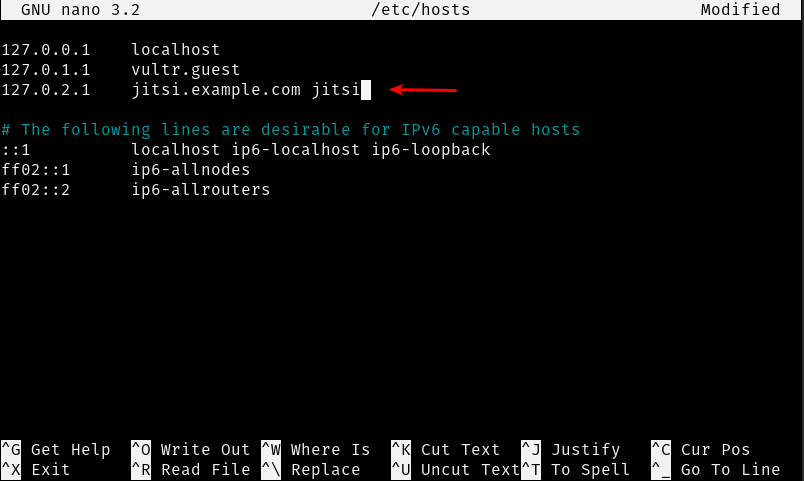
Use [Ctrl-X] to quit and [Y] for yes to save the file.
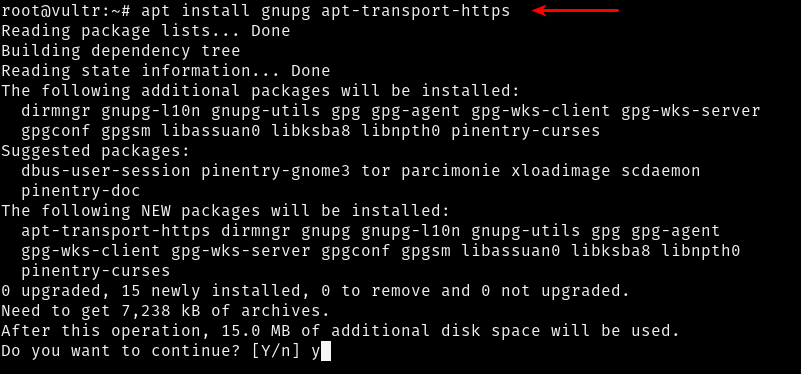
4: Install prerequisite packages:
apt install sudo gnupg apt-transport-https
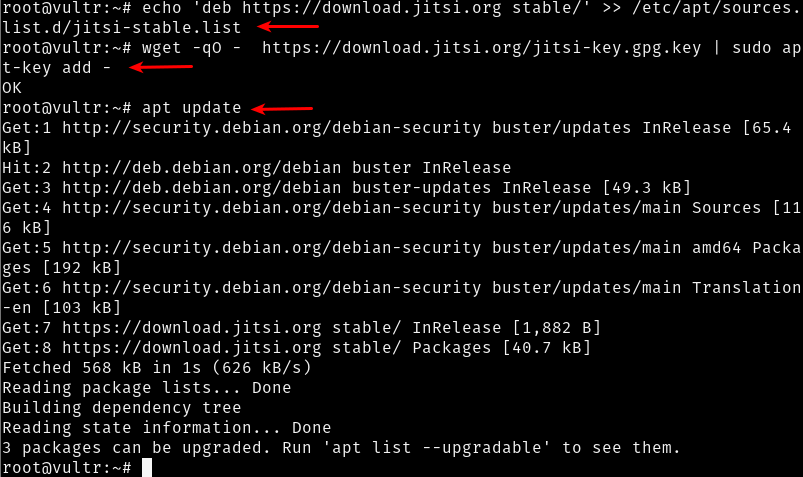
5: Add the Jitsi repository to package manager and refresh the package lists:
echo 'deb https://download.jitsi.org stable/' >> /etc/apt/sources.list.d/jitsi-stable.list
wget -qO -  https://download.jitsi.org/jitsi-key.gpg.key | sudo apt-key add -
apt update
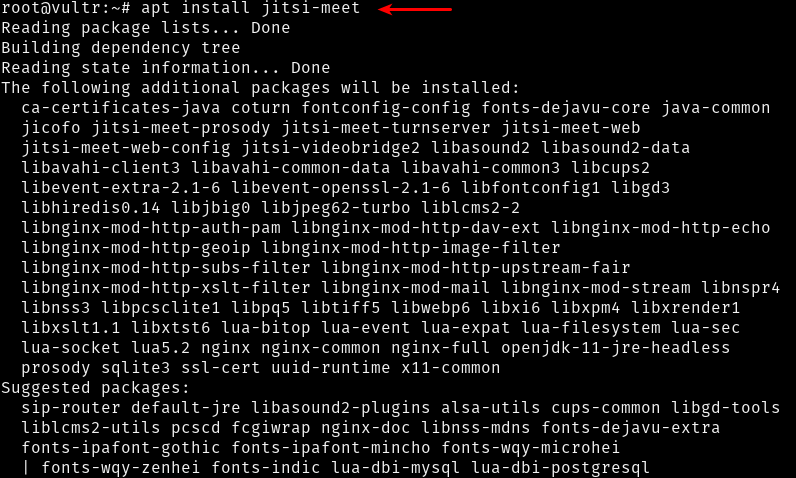
6: Install the Jitsi Meet package:
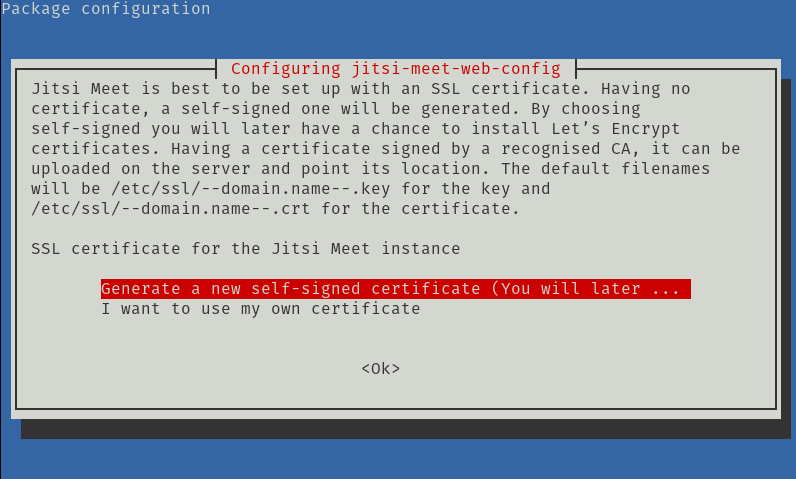
apt install jitsi-meet
When prompted, enter your FQDN, e.g. jitsi.example.com
Then, select the option to generate a self-signed certificate during installation.
7: Secure the server with a publicly-usable SSL/TLS certificate using Let’s Encrypt:
Run the following command to create an SSL/TLS security certificate for the server. This will ensure that all communication to and from your Jitsi server is encrypted. (This is what enables the little padlock 🔒 icon to appear next to the web address in your browser.)
/usr/share/jitsi-meet/scripts/install-letsencrypt-cert.sh
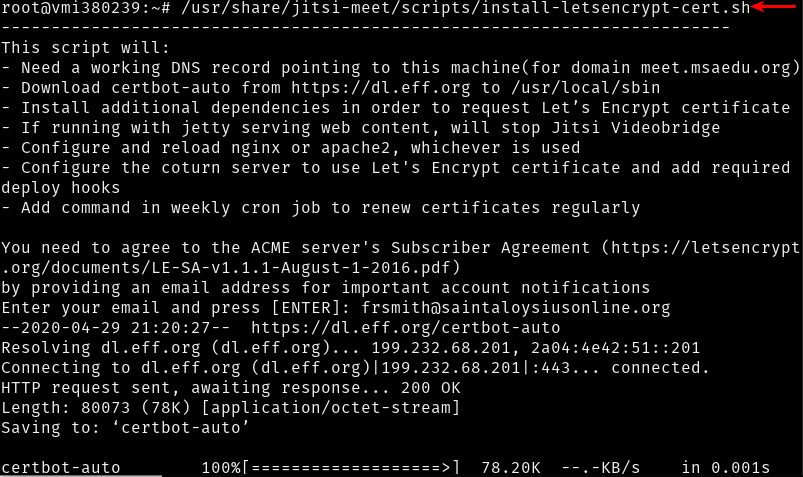
When prompted, enter a valid e-mail address.
8: Setup Authentication for Moderators
This is the most important step for those who are running their own instance of Jitsi Meet. At this point, Jitsi is installed and running, but is completely open to the public and anyone can create a chat room on the server.
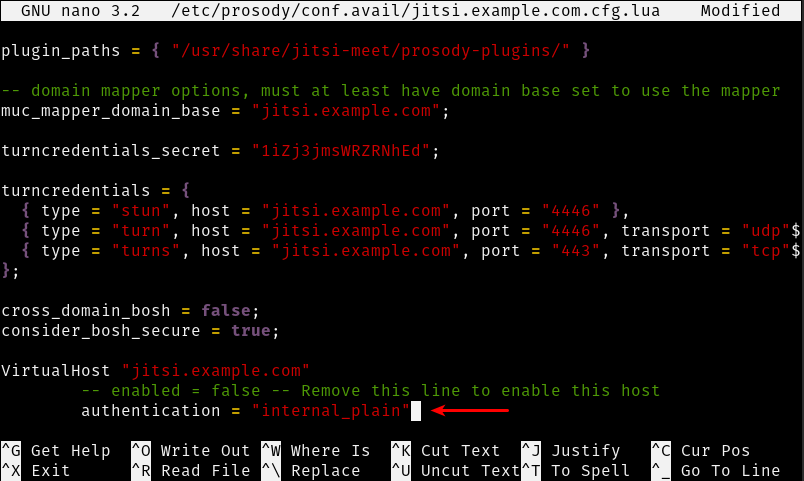
A: To require authentication to create or join a room on the server, open the Prosody configuration file (change jitsi.example.com to your domain):
nano /etc/prosody/conf.avail/jitsi.example.com.cfg.lua
Change the “authentication” option from “anonymous” to “internal_plain”:
B: Next, use the arrow keys or [PgDn] to scroll to the bottom of the file and add the following lines (change jitsi.example.com to your FQDN):
VirtualHost "guest.jitsi.example.com"
    authentication = "anonymous"
    c2s_require_encryption = false
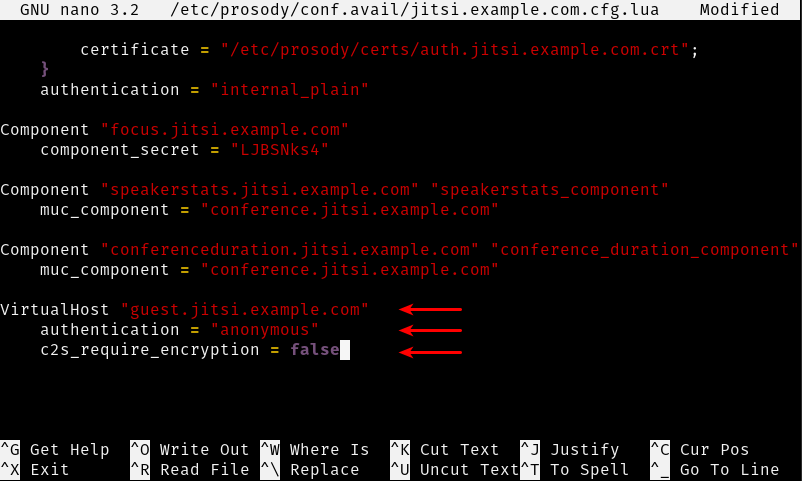
Use [Ctrl-X] to quit and [Y] for yes to save the file.
C: Next, open the Jicofo configuration file:
nano /etc/jitsi/jicofo/sip-communicator.properties
Add this option to the bottom of the file (change jitsi.example.com to your FQDN):
org.jitsi.jicofo.auth.URL=XMPP:jitsi.example.com
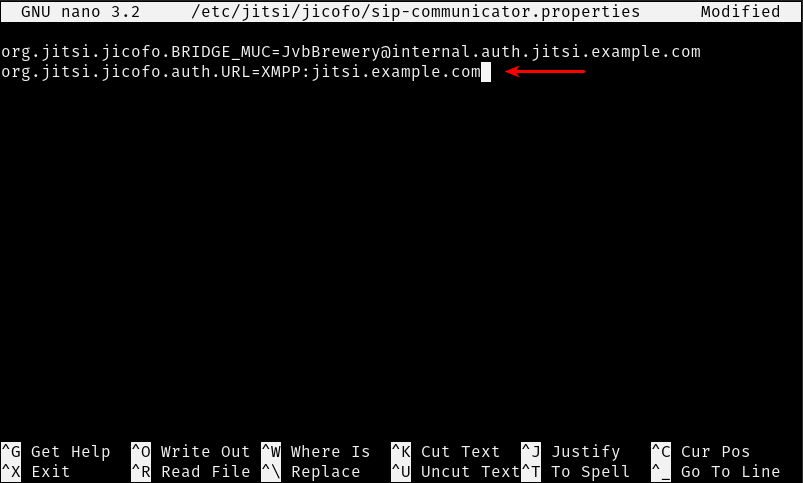
Use [Ctrl-X] to quit and [Y] for yes to save the file.
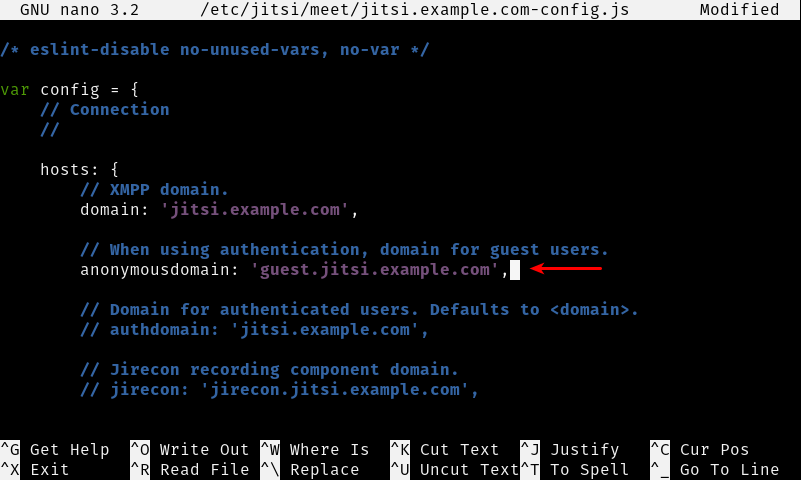
D: Open the Jitsi Meet configuration file (change jitsi.example.com to your FQDN):
nano /etc/jitsi/meet/jitsi.example.com-config.js
Uncomment (remove the //) and set the “anonymousdomain” option (change jitsi.example.com to your FQDN):
anonymousdomain: 'guest.jitsi.example.com',
E: Create Moderators/Users
To create a moderator user in Prosody, run the following command, replacing yourusernamehere with the moderator’s name (e.g. johnsmith), replacing jitsi.example.com with your own FQDN, and replacing P@ssw0rd with the password of your choosing.
prosodyctl register yourusernamehere jitsi.example.com P@ssw0rd
Repeat the above command for each moderator you would like to add, replacing the username and password for each subsequent moderator.
Write all usernames and passwords down so they can be shared with your moderators. A username and password will now be required to be able to create meetings on the server.
F: Restart Jitsi
Finally, restart the Prosody and Jitsi services to apply changes:
systemctl restart prosody
systemctl restart jicofo
systemctl restart jitsi-videobridge2
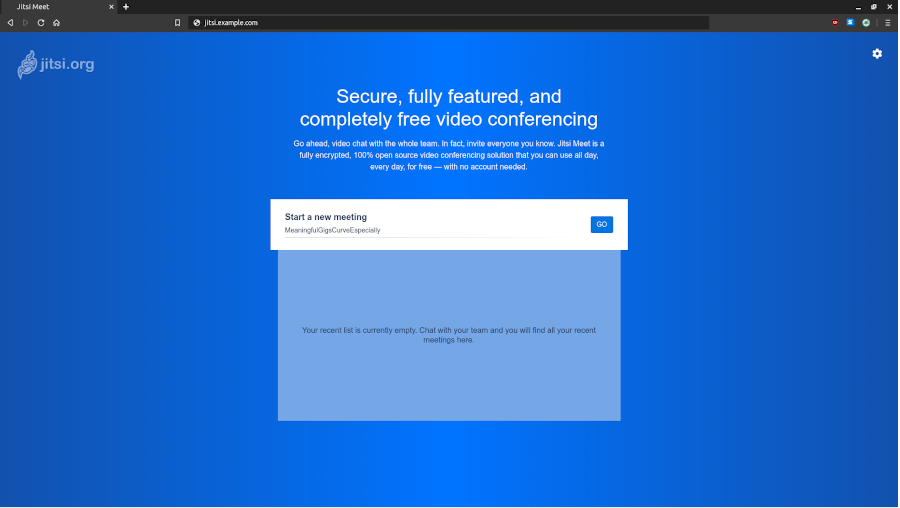
Step 5: Begin Using Jitsi Meet
Open your favorite web browser and navigate to your new Jitsi server.
For more information on how to use Jitsi Meet, please refer to the official documentation at jitsi.org .

Share this post
Twitter
Facebook
Pinterest
Email